04 Programming Run-time Administration
< Back to 03 CAS Libraries and Formats
- 11. Create new launcher contexts
- 12. Update Launcher service sas.launcher.max Configuration
- 13. Create new compute contexts
- 14. Update the autoexec in a compute context
- 15. Update global compute server autoexec
- 16. Create a SAS program file
- 17. Submit the program as a new SAS Batch job, to run interactively
- 18. Submit the program to run asyncronously as a Batch job
11. Create new launcher contexts
-
Navigate to SAS Environment Manager (‘Manage Environment’), and the Contexts page.
-
Switch the view to Launcher contexts. This is the default view.
-
Right-click SAS Studio launcher context, and choose Copy.
-
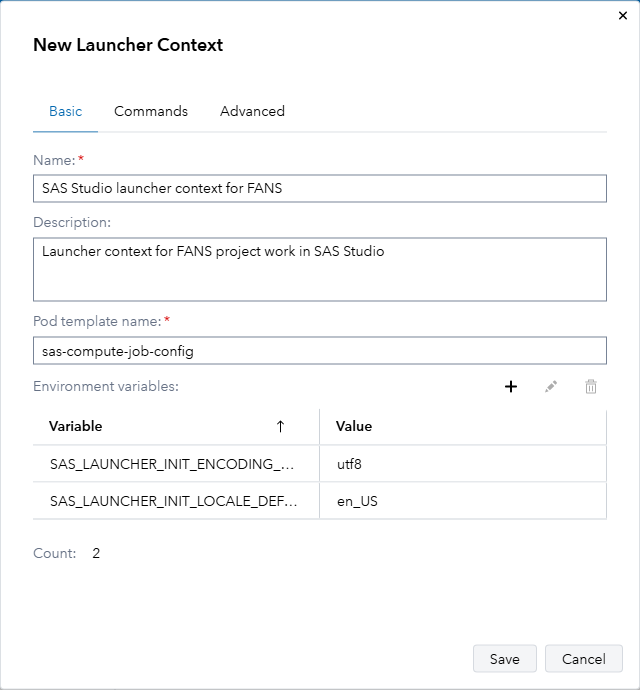
In the New Launcher Context dialog, change the context’s properties as follows:
Field Value Name SAS Studio launcher context for [Project],</br>e.g. SAS Studio launcher context for FANS Description Launcher context for FANS project work in SAS Studio Pod template name sas-compute-job-config Environment variables Leave these as they are Leave all other options at their default values, and Save your new launcher context. The Basic page should look like this:
-
See all the launcher contexts, and the detail of the one you just created, from the command-line:
# List existing launcher context, with output in text format sas-viya --output text launcher contexts list --limit 40 # See the properties of the SAS Studio launcher context, with output in text format sas-viya --output text launcher contexts show --name "SAS Studio launcher context for ${project_name}" -
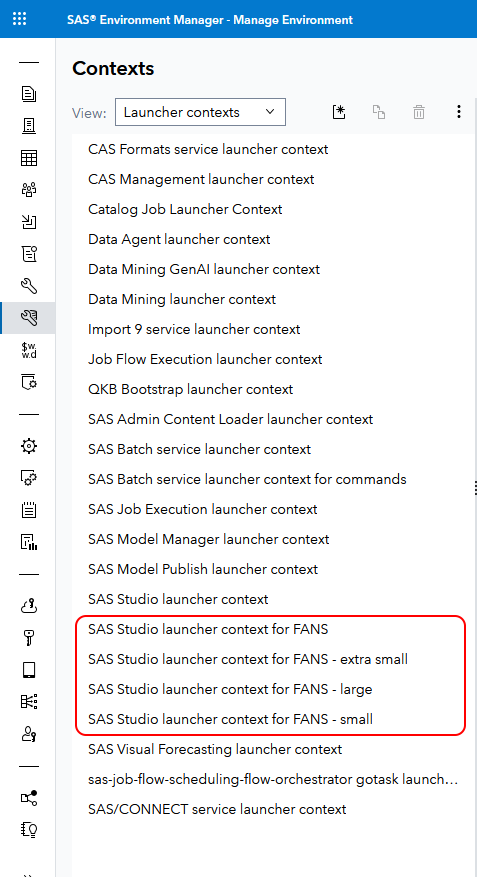
Create three more launcher contexts from the command-line:
# Create an extra small launcher context for the project
sas-viya launcher contexts create \
  --name "SAS Studio launcher context for ${project_name} - extra small" \
  --description "Extra small launcher context for ${project_name} project work in SAS Studio" \
  --launch-type kubernetes \
  --job-pod-template-name sas-compute-job-config \
  --environment "SAS_LAUNCHER_INIT_ENCODING=utf-8;SAS_LAUNCHER_INIT_LOCALE=en_US" \
   --command-allowlist "/opt/sas/viya/home/bin/compsrv_start.sh" \
   --workload-orchestrator-queue "default" \
   --cpu-limit 1 \
   --cpu-request 50m \
   --memory-limit 2Gi \
   --memory-request 300M

# Create a small launcher context for the project
sas-viya launcher contexts create \
  --name "SAS Studio launcher context for ${project_name} - small" \
  --description "Small launcher context for ${project_name} project work in SAS Studio" \
  --launch-type kubernetes \
  --job-pod-template-name sas-compute-job-config \
  --environment "SAS_LAUNCHER_INIT_ENCODING=utf-8;SAS_LAUNCHER_INIT_LOCALE=en_US" \
   --command-allowlist "/opt/sas/viya/home/bin/compsrv_start.sh" \
   --workload-orchestrator-queue "default" \
   --cpu-limit 2 \
   --cpu-request 50m \
   --memory-limit 2Gi \
   --memory-request 300M

# Create a large launcher context for the project
sas-viya launcher contexts create \
  --name "SAS Studio launcher context for ${project_name} - large" \
  --description "Large launcher context for ${project_name} project work in SAS Studio" \
  --launch-type kubernetes \
  --job-pod-template-name sas-compute-job-config \
  --environment "SAS_LAUNCHER_INIT_ENCODING=utf-8;SAS_LAUNCHER_INIT_LOCALE=en_US" \
   --command-allowlist "/opt/sas/viya/home/bin/compsrv_start.sh" \
   --workload-orchestrator-queue "default" \
   --cpu-limit 8 \
   --cpu-request 50m \
   --memory-limit 2Gi \
   --memory-request 300M
Expected output - the new launcher contexts have been created and are each represented in their full JSON form:
The SAS Launcher context was successfully created ...large JSON representation of the context... -
In SAS Environment manager, refresh the list of launcher contexts. You should see the small and large launcher contexts alongside the SAS Studio Launcher Context for [Project].
-
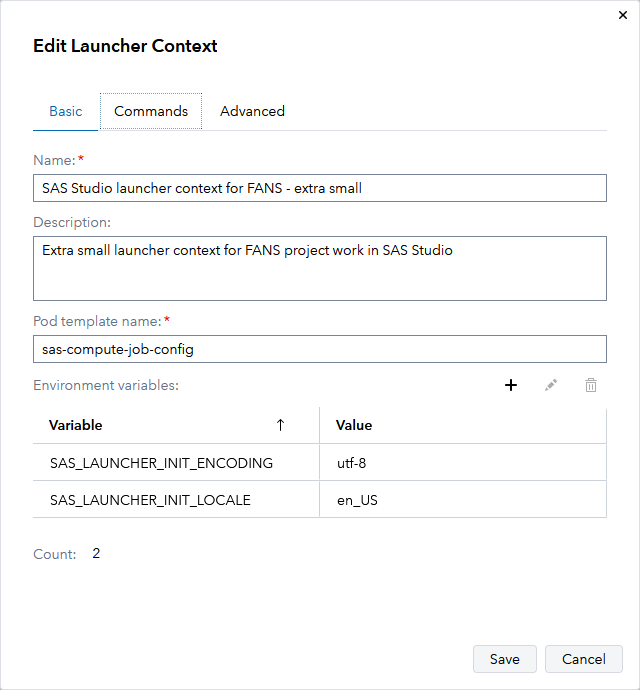
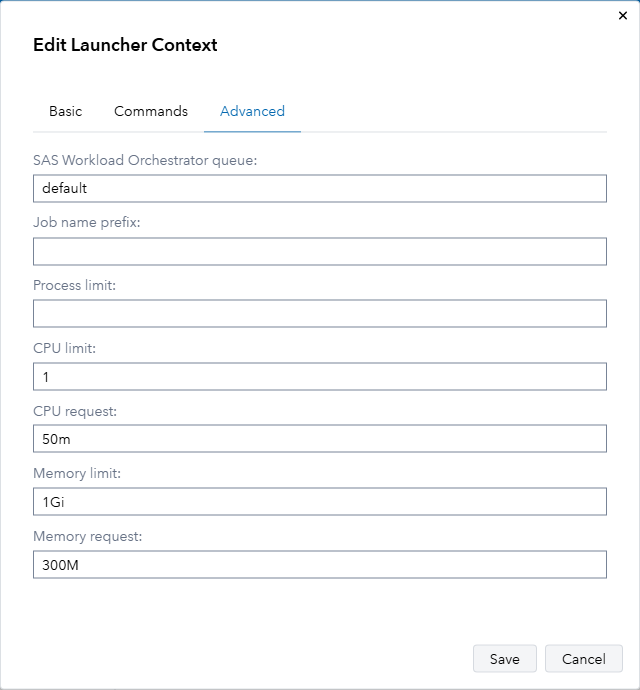
Review the properties of the “Launcher context for FANS project work in SAS Studio - extra small”. Here it is in the Edit Launcher Context window, but you don’t need to make any changes to it:
Basic tab:
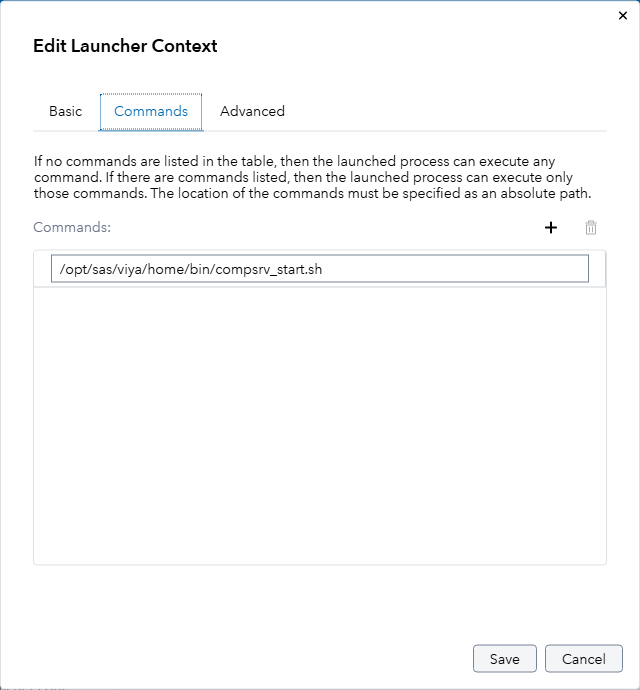
Commands tab:
Advanced tab:
-
Similarly, review the “Launcher context for FANS project work in SAS Studio - small” and “Launcher context for FANS project work in SAS Studio - large” in SAS Environment manager too. Their names, descriptions and CPU and memory limits and requests should differ as specified in the commands you ran to create them.
12. Update Launcher service sas.launcher.max Configuration
Our environment has the following default values specified in the Launcher service’s sas.launcher.default configuration instance:
- cpu.limit: 2
- cpu.request: 50m
- memory.limit: 2Gi
- memory.request: 300M
Those values are used for all SAS Launcher contexts which do not specify a different value, e.g. the out-of-the-box SAS Studio launcher context, and our SAS Studio launcher context for FANS.
The following maximum values are specified in the SAS Launcher service’s sas.launcher.max configuration instance:
- cpu.limit: 2
- cpu.request: 100m
- memory.limit: 2Gi
- memory.request: 500M
These are the largest values that are valid in an individual launcher context. If a launcher context exceeds these maximums, a programming run-time session requested under compute, connect or batch context that uses that launcher context will be prevented from starting. We have just created a large launcher context which has a CPU limit (8) which is larger than current limit (2). Until we increase the maximum values, compute contexts that use our new large launcher context will be unable to start. Let’s increase the limit.
-
In SAS Environment Manager, switch to the Configuration page.
-
In the All services view, type ‘launcher’ in the filter textbox, and select Launcher service.
-
Collapse all the configuration instances on the right hand side of the window.
-
Edit sas.launcher.max. Set change the following attributes to these values:
-
cpu.limit: 2 → 8
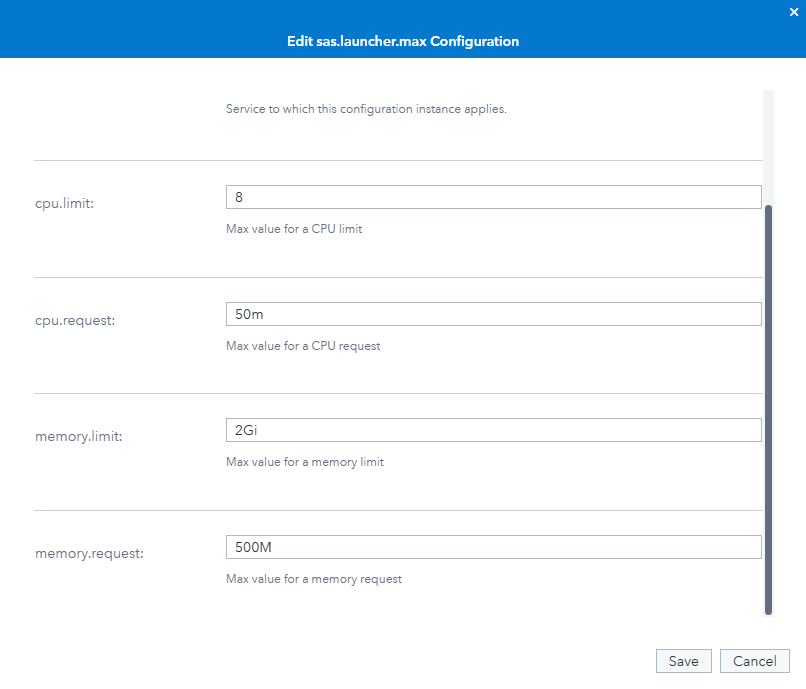
- Save your changes.
The increased maximum CPU should enable compute sessions to run in compute servers launched under the “SAS Studio launcher context for [Project] - large”.
Note: The largest values you can safely use depend on many factors including the available resources on your Kubernetes cluster’s nodes, and how heavily loaded your Kubernetes nodes are. In my limited testing while writing this hands-on activity, these new larger values seem to work okay in this environment. So far nothing has crashed and no sas-compute-server pods failed to start or were terminated unexpectedly.
Sizing and performance optimization is a complex subject and we recommend a technical architect be involved to make informed sizing decisions. A rather simplistic approximation is that most SAS programming run-time steps are limited by disk I/O read and write speed, and only a few steps are speed-limited by some aspect of CPU or memory, though some steps are. Optimizing performance may well require trial-and-error testing: see if a change works or fails, or makes your code and environment run better or worse. However, once good sizing decisions are available, at least you now know one way to apply them to a SAS Viya deployment.
You can also apply some SAS programming run-time configuration changes with kustomize overlays placed in the site-config directory and referenced in kustomization.yaml, then redeploying SAS Viya. That is beyond the scope of this activity - our time is short already.
13. Create new compute contexts
Create a standard project compute context.
-
Navigate to SAS Environment Manager (‘Manage Environment’), and navigate back to the Contexts page.
-
This time, switch the view to Compute contexts.
-
Right-click SAS Studio compute context, and choose Copy.
-
In the New Compute Context dialog, change the context’s properties as follows:
Field Value Name SAS Studio compute context for [Project],</br>e.g. SAS Studio compute context for FANS Description Compute context for FANS project work in SAS Studio Launcher context SAS Studio launcher context for [Project],</br>e.g. SAS Studio launcher context for FANS Identity type Identities Select your project custom group, e.g. FANS Attributes (none) Advanced, SAS Workload Orchestrator queue (blank) Advanced, SAS Options (blank) Advanced, Autoexec content %let context_name=SAS Studio compute context for [Project];</br>e.g. %let context_name=SAS Studio compute context for FANS; -
Click Save. This context is like the SAS Studio compute context, except that it uses your standard project launcher context.
The sas-viya compute contexts create command have a comprehensive set of parameters like the sas-viya launcher contexts create command does. Instead, it can take either of two JSON representations of a compute context, stored locally where the sas-viya CLI is running.
-
Run this to create three new JSON files each defining more compute contexts we want to create:
# Create a JSON file defining an extra small compute context for your project # It will create compute sessions with less CPU and memory available because it references the extra small launcher context. It also sets a smaller value for MEMSIZE and CPUCOUNT. tee /home/cloud-user/${project_name_lowercase}compute_context_extra_small.json > /dev/null << EOF { "name": "SAS Studio compute context for ${project_name} - extra small", "description": "Small compute context for ${project_name} project work in SAS Studio", "environment": { "autoExecLines": [ "%let context_name=SAS Studio compute context for ${project_name} - extra small;" ], "options": [ "-CPUCOUNT 1" ] }, "launchContext": { "contextName": "SAS Studio launcher context for ${project_name} - extra small" }, "launchType": "service", "authorizedGroups": [ "${project_name_lowercase}" ] } EOF # Create a JSON file defining a small compute context for your project # It will create compute sessions with less CPU and memory available because it references the small launcher context. It also sets a smaller value for MEMSIZE and CPUCOUNT. tee /home/cloud-user/${project_name_lowercase}compute_context_small.json > /dev/null << EOF { "name": "SAS Studio compute context for ${project_name} - small", "description": "Small compute context for ${project_name} project work in SAS Studio", "environment": { "autoExecLines": [ "%let context_name=SAS Studio compute context for ${project_name} - small;" ], "options": [ "-CPUCOUNT 2" ] }, "launchContext": { "contextName": "SAS Studio launcher context for ${project_name} - small" }, "launchType": "service", "authorizedGroups": [ "${project_name_lowercase}" ] } EOF # Create a JSON file defining a large compute context for your project # It will create compute sessions with more CPU and memory available because it references the large launcher context. It also sets a larger value for MEMSIZE and CPUCOUNT # We set the authorizedGroups property so that this context can only be used by project power users (SAS Administrators will also be able to use it) tee /home/cloud-user/${project_name_lowercase}compute_context_large.json > /dev/null << EOF { "name": "SAS Studio compute context for ${project_name} - large", "description": "Large compute context for ${project_name} project work in SAS Studio", "environment": { "autoExecLines": [ "%let context_name=SAS Studio compute context for ${project_name} - large;" ], "options": [ "-CPUCOUNT 8" ] }, "launchContext": { "contextName": "SAS Studio launcher context for ${project_name} - large" }, "launchType": "service", "authorizedGroups": [ "${project_name_lowercase}_power_users" ] } EOF -
Then run this to use those three JSON files as definitions to create the three new compute contexts:
# Create the new compute contexts from those JSON files sas-viya compute contexts create -r -d @/home/cloud-user/${project_name_lowercase}compute_context_extra_small.json sas-viya compute contexts create -r -d @/home/cloud-user/${project_name_lowercase}compute_context_small.json sas-viya compute contexts create -r -d @/home/cloud-user/${project_name_lowercase}compute_context_large.json -
In SAS Environment Manager, on the Contexts page, still in the Compute contexts view, refresh the list of contexts.
-
Find the three new compute contexts you just created, e.g.:
- SAS Studio compute context for FANS
- SAS Studio compute context for FANS - extra small
- SAS Studio compute context for FANS - large
- SAS Studio compute context for FANS - small

-
Review the new contexts to verify that they are configured as we specified, referencing the new launcher contexts (which we just created too), restricted to only be usable by the specified project groups, and with the correct content in their SAS Options and Autoexec code on the Advanced tab.
14. Update the autoexec in a compute context
Update an autoexec using SAS Environment Manager
-
In SAS Environment Manager, as sasadm, navigate to the Contexts page, and select the Compute contexts view.
-
Edit the first SAS Studio compute context for [Project], e.g. SAS Studio compute context for FANS.
-
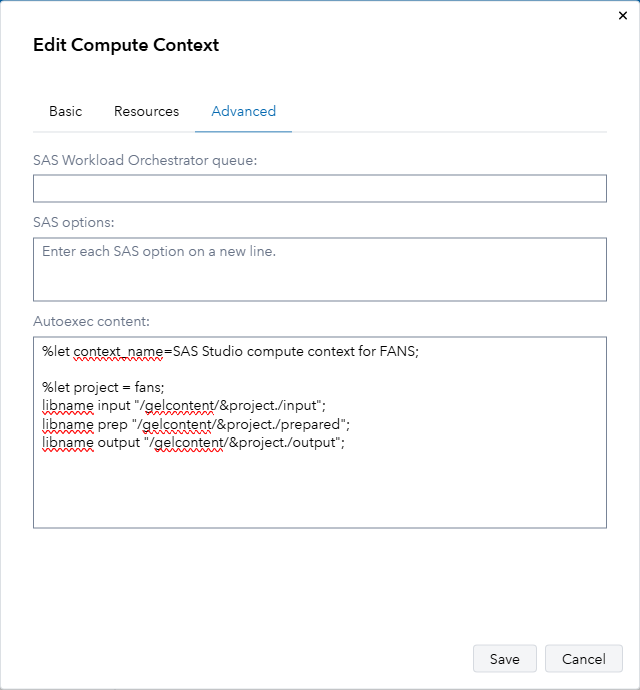
In the Edit compute context dialog, select the Advanced tab.
When you created this compute context you already added this line to the autoexec content:
%let context_name=SAS Studio compute context for FANS; -
If the Autoexec contents textbox does not already contain the following SAS code, add it (changing ‘fans’ in the first line to your project name if you chose a different project name):
Note: Do not replace the existing
%letstatement above, because it can be useful in a task in the ‘Bonus’ section of this activity. Add this below that line.%let project = fans; libname input "/gelcontent/&project./input"; libname prep "/gelcontent/&project./prepared"; libname output "/gelcontent/&project./output";It should look something like this:
Note: You can also define macros and set SAS system options in autoexec code, for example:
options mlogic;. -
Save your changes.
As you see, adding code to an existing autoexec code block (if it is not in the autoexec code block already) is quite easy to do interactively in SAS Environment Manager. It is a bit harder to do programatically, so here follows a method to help you do that.
Update autoexecs from the command line
We have two other project compute contexts - the small and large ones. We will now add the same code to their autoexec code blocks from the command line, using my add_code_to_compute_context_autoexec() function from https://communities.sas.com/t5/SAS-Communities-Library/Add-statements-to-an-existing-SAS-Viya-compute-context-autoexec/ta-p/951324
Doing this requires a pyviyatool, updatecomputecontext.py. The pyviyatools project is publically available on GitHub at https://github.com/sassoftware/pyviyatools.
The pyviyatools are installed and configured in your hands-on activity environment:
-
Run this to see the pyviyatools directory containing many Python scripts:
ll /opt/pyviyatools/ -
Run this to define a bash function called add_code_to_compute_context_autoexec (), which we can use to add new code to an existing compute context’s autoexec code block:
Tip: You could define this function in a script in any of several ways. We will only call it a small number of times in this activity, so we may as well just define it in our interactive shell.
Tip: This is a HUGE block of code. Make sure you copy it all, and run it all at once.
export pyviyatools_path="/opt/pyviyatools/"

add_code_to_compute_context_autoexec ()
{
  # Delete any old working files from previous runs: /tmp/compute_*.json, /tmp/compute_*.txt
  rm -f /tmp/compute_*.json /tmp/compute_*.txt

  compute_context_name="${1}"
  file_code_to_add="${2}"

  # Test that the first input parameter is the name of a SAS compute context, and returns valid JSON document
  sas-viya --output fulljson compute contexts show -n "${compute_context_name}" 2>&1 > /tmp/compute_context_config.json
  # cat /tmp/compute_context_config.json
  if [ -s /tmp/compute_context_config.json ]; then
      # Something was written to the file - is it JSON?
      retval=$(jq -re '""' /tmp/compute_context_config.json 2>&1)
      # echo "Found compute context named ${compute_context_name} in SAS Viya"
      if [ ! -z "${retval}" ]; then
        echo "Error: invalid JSON while getting \"${compute_context_name}\" using sas-viya CLI - ${retval}."
        return 1
      fi
  else
      echo "Error: Compute context \"${compute_context_name}\" not found."
      return 1
  fi

  # Test that the second input parameter is populated and the file path contains exists
  if [ -f ${file_code_to_add} ]; then
    # echo "File \"${file_code_to_add}\" exists"

    # Delete some of the parts of compute_context_config.json we won't need.
    # (It may still contains some parts we don't need, but this is clean enough to be readable.)
    jq -r 'del( .links )' /tmp/compute_context_config.json > /tmp/compute_context_config_clean.json
    # cat /tmp/compute_context_config_clean.json

    # Many compute contexts, and all out-of-the-box compute contexts do not have any autoexec code
    # Therefore, they do not have the keys for one in their JSON definition.
    # Check whether the key for an autoexec code block exists. If it does, get the autoexec code from it.
    # If it does not, create it.
    if [[ $(jq -e '.environment | has("autoExecLines")' /tmp/compute_context_config_clean.json) == "true" ]]; then
      echo 'Compute context has autoExecLines'
      jq -r '.environment.autoExecLines[]' /tmp/compute_context_config_clean.json > /tmp/compute_context_autoexec.txt
      cp /tmp/compute_context_config_clean.json /tmp/compute_context_config_with_autoexec.json
    else
      echo 'Compute context does not have autoExecLines, adding an empty array for them'
      jq -r '.environment |= {"autoExecLines": []} + . ' /tmp/compute_context_config_clean.json > /tmp/compute_context_config_with_autoexec.json
      # cat /tmp/compute_context_config_with_autoexec.json
      rm -f /tmp/compute_context_autoexec.txt
      touch /tmp/compute_context_autoexec.txt
    fi
    # cat /tmp/compute_context_config_with_autoexec.json
    # cat /tmp/compute_context_autoexec.txt

    # Convert the multiline content of ${file_code_to_add} to a single line
    # with a \n for each newline, for use in the test below to see if it is already in the existing autoexec.
    cat ${file_code_to_add} | sed -n 'H;${x;s/^\n//;s/\n/\\n/g;p}' > /tmp/compute_autoexec_code_to_add_oneline.txt
    # cat /tmp/compute_autoexec_code_to_add_oneline.txt

    # Convert the multiline content of /tmp/compute_context_autoexec.txt to a single line
    # with a \n for each newline, for use in the test below.
    cat /tmp/compute_context_autoexec.txt | sed -n 'H;${x;s/^\n//;s/\n/\\n/g;p}' > /tmp/compute_context_autoexec_oneline.txt
    # cat /tmp/compute_context_autoexec_oneline.txt

    # Load strings containing the context's existing autoexec code and the candidate code to add to it in variables.
    compute_context_autoexec_code_oneline=$(cat /tmp/compute_context_autoexec_oneline.txt)
    compute_context_autoexec_code_to_add_oneline=$(cat /tmp/compute_autoexec_code_to_add_oneline.txt)
    # echo ${compute_context_autoexec_code_oneline}
    # echo ${compute_context_autoexec_code_to_add_oneline}

    # If compute_autoexec_code_oneline.txt does not already contain compute_autoexec_code_to_add_oneline.txt, add it. If it already contains that block of code verbatim, do nothing.
    if [[ ${compute_context_autoexec_code_oneline} == *"${compute_context_autoexec_code_to_add_oneline}"* ]]; then
      echo "The context's autoexec code block already contains that code. Nothing to do."
    else
      echo "The context's autoexec code block does not yet contain that code. Adding it."

      # Append the new autoexec code to the existing autoexec code block
      rm -f /tmp/compute_context_autoexec_code_multiline_final.txt
      cat /tmp/compute_context_autoexec.txt \
          ${file_code_to_add} > /tmp/compute_context_autoexec_code_multiline_final.txt
      # cat /tmp/compute_context_autoexec_code_multiline_final.txt

      # Convert it back to a JSON array
      jq -R -s 'split("\n")' < /tmp/compute_context_autoexec_code_multiline_final.txt > /tmp/compute_context_autoexec_array.txt
      # cat /tmp/compute_context_autoexec_array.txt

      # Replace the existing autoexec lines array in the JSON for the compute context with this new one
      autoexec_array=$(cat /tmp/compute_context_autoexec_array.txt)
      # echo $autoexec_array
      jq -r --argjson autoexec_array "$autoexec_array" '.environment.autoExecLines = $autoexec_array' /tmp/compute_context_config_with_autoexec.json > /tmp/compute_context_config_with_autoexec_updated.json
      # cat /tmp/compute_context_config_with_autoexec_updated.json

      # There is no such command as "sas-viya compute contexts update" in the compute plugin to the SAS Viya CLI at the time of writing.
      # So we cannot update the compute context with a command like this:
      #
      #    sas-viya compute contexts update -r -d @/tmp/compute_context_config_with_autoexec_updated.json
      #
      # "sas-viya compute contexts" has sub-commands for create, delete, generate-template, list, show and validate.
      # But at the time I wrote this example, there is no "update" sub-command, so I wrote a pyviyatool to update compute contexts.

      # Update the compute context using the updatecomputecontext.py pyviyatool
      ${pyviyatools_path}/updatecomputecontext.py -n "${compute_context_name}" -f /tmp/compute_context_config_with_autoexec_updated.json
    fi
  else
    echo "File \"${file_code_to_add}\" not found"
  fi
}
Some notes about the add_code_to_compute_context_autoexec() bash function defined above:
- add_code_to_compute_context_autoexec() relies on the SAS Viya Command-line Interface (sas-viya), and expects to find it from the command sas-viya. So, before you use the function in this post, you must install and configure the CLI to connect to your SAS Viya deployment, and then authenticate as a user who is a SAS Administrator. This has been written about a lot, not least in these posts:
- Gerry Nelson: SAS Viya Command-Line Interface for Administration (update)
- Gerry Nelson: Overview of installing and using the SAS Viya containerized CLI
- Stuart Rogers: SAS Viya CLI with Group-Managed Service Accounts
- If the sas-viya executable or an alias or link to it is not in your path, you may need to modify the function to add the path to sas-viya in your environment, or provide it in an environment variable.
- The function uses jq: https://github.com/jqlang/jq.
- The function uses a new pyviyatool, updatecomputecontext.py. If you have not installed the pyviyatools, see the project README.md or INSTALL.md instructions in GitHub. If you already have the pyviyatools installed from before 18 November 2024, you may need to run a git pull or similar command to get updatecomputecontext.py.
- The function deletes and creates a set of text files (containing JSON and plain text) in the /tmp directory, named like /tmp/compute_.json and /tmp/compute_.txt. If this might cause an issue in your environment, feel free to modify the function as you see fit to store the temporary files somewhere else.
- There are quite a few commented-out cat and echo statements, which were useful to me during the function’s development. I left them in the script in case they prove useful to you.
- add_code_to_compute_context_autoexec() relies on the SAS Viya Command-line Interface (sas-viya), and expects to find it from the command sas-viya. So, before you use the function in this post, you must install and configure the CLI to connect to your SAS Viya deployment, and then authenticate as a user who is a SAS Administrator. This has been written about a lot, not least in these posts:
-
Run this to create a file containing some additional lines of autoexec code:
# Create a file containing the SAS code you want to add to an autoexec if it doesn't # already contain this code. tee /tmp/autoexec_code_to_add.txt > /dev/null << EOF %let project = ${project_name_lowercase}; libname input "/gelcontent/&project./input"; libname prep "/gelcontent/&project./prepared"; libname output "/gelcontent/&project./output"; EOF # cat /tmp/autoexec_code_to_add.txt -
Then run this to add that extra autoexec code to all four of our new compute contexts:
# Update the first compute contexts to add the additional code to its autoexec code block
# If you already added this code manually, and it is *exactly* as written in that file,
# you should get a message saying "The context's autoexec code block already contains that code. Nothing to do."
# *However* if the code you added differs even slightly from the content of this file, it might be added again.
add_code_to_compute_context_autoexec "SAS Studio compute context for ${project_name}" "/tmp/autoexec_code_to_add.txt"

# Update the other three new compute contexts, to add the additional code to each of their autoexec code blocks
add_code_to_compute_context_autoexec "SAS Studio compute context for ${project_name} - extra small" "/tmp/autoexec_code_to_add.txt"
add_code_to_compute_context_autoexec "SAS Studio compute context for ${project_name} - small" "/tmp/autoexec_code_to_add.txt"
add_code_to_compute_context_autoexec "SAS Studio compute context for ${project_name} - large" "/tmp/autoexec_code_to_add.txt"
The add_code_to_compute_context_autoexec function is intended to be smart enough to do nothing if you try to add some autoexec code that is already in the compute context’s autoexec code block, verbatim, with the exact same formatting and spacing.
-
In SAS Environment Manager, inspect the autoexec code on the Advanced tab for your extra small, small and large project compute contexts.
Q: Do you see the code that came from /tmp/autoexec_code_to_add.txt in each of them?
Q: Is the same autoexec code present once, or twice in “SAS Studio compute context for ${project_name}”? If twice, remove the duplicate copy, and save your changes.
15. Update global compute server autoexec
Add a line to global compute server autoexec to define a libname or macro or SAS options or something else.
-
In SAS Environment Manager, navigate to the Configuration page.
-
Choose All services from the View dropdown menu.
-
Type compute in the search box, and select Compute Service.
-
On the right-hand side of the Configuration page, collapse all of the configuration instances.
-
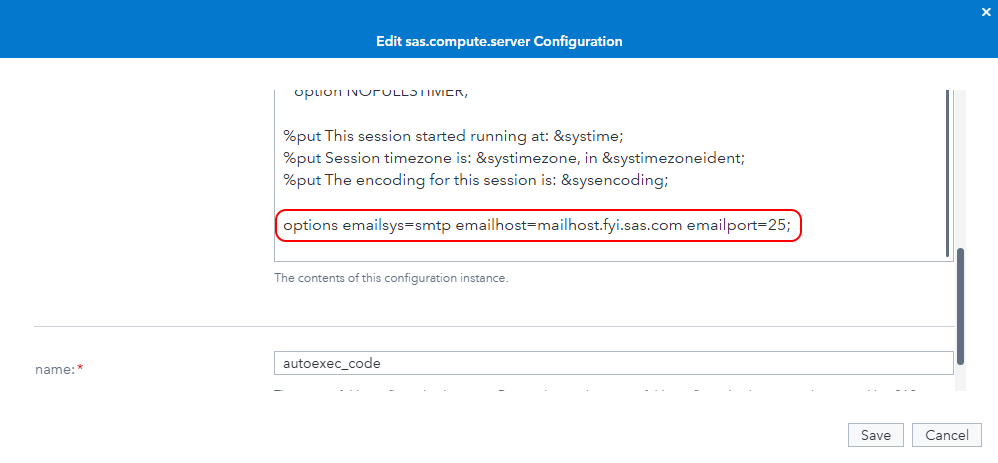
Edit sas.compute.server: autoexec_code.
-
In the contents textbox for the autoexec_code, add this block of SAS code statements:
/* Macro debugging */ option symbolgen mlogic mprint; * option nosymbolgen nomlogic nomprint; /* Detailed system performance statistics and the datetime stamp */ option FULLSTIMER; * option NOFULLSTIMER; %put This session started running at: &systime; %put Session timezone is: &systimezone, in &systimezoneident; %put The encoding for this session is: &sysencoding; -
Save your changes.
-
You can also modify the global compute server autoexec programmatically, though it does involve a bit of gymnastics with jq. Here’s an example you could use. This example adds a single line of autoexec code, defined near the beginning as the value of
new_autoexec_line:#!/bin/bash # Line to add to Compute Server autoexec_code new_autoexec_line="options emailsys=smtp emailhost=mailhost.fyi.sas.com emailport=25;" # Create timestamp _currentTimeStamp=$(date "+%Y%m%d-%H%M%S") # Define filenames which are unlikely to clash orig_json=/tmp/compute_autoexec_code_config_orig_${_currentTimeStamp}.json orig_autoexec_content=/tmp/compute_autoexec_code_content_orig_${_currentTimeStamp}.txt mod_autoexec_content=/tmp/compute_autoexec_code_content_modified_${_currentTimeStamp}.txt mod_autoexec_content_json=/tmp/compute_autoexec_code_content_modified_${_currentTimeStamp}.json mod_json=/tmp/compute_autoexec_code_config_modified_${_currentTimeStamp}.json # Extract the configuration echo "Download current Compute Service autoexec_code configuration" sas-viya configuration configurations download \ --definition-name sas.compute.server \ --service compute \ | jq -r 'del( .links) | del(.items[] | select(.name!="autoexec_code")) | del(.items[].links) | del(.items[].metadata.modifiedTimeStamp) | del(.items[].metadata.modifiedBy) | .count = 1 | .items[].metadata.isDefault = false' > $orig_json # cat $orig_json # Get the content part of the configuration echo "Modify Compute Service autoexec_code content" jq -r '.items[0].contents' $orig_json > $orig_autoexec_content # cat $orig_autoexec_content # Modify it, adding the new_autoexec_line at the end of the existing content cp $orig_autoexec_content $mod_autoexec_content echo $new_autoexec_line >> $mod_autoexec_content jq -sR . $mod_autoexec_content > $mod_autoexec_content_json # cat $mod_autoexec_content_json # Replace the content part of the configuration with the modified version in the JSON file jq -r --slurpfile newcontents $mod_autoexec_content_json '.items[0].contents=$newcontents[]' $orig_json > $mod_json # cat $mod_json # Apply the configuration echo "Apply new Compute Service autoexec_code configuration" sas-viya configuration configurations update --file $mod_json # Cleanup rm $orig_json $orig_autoexec_content $mod_autoexec_content $mod_autoexec_content_json $mod_json -
Switch back to SAS Environment manager, and refresh the configuration page view.
Note: You will not see the new line of code in the compute service autoexec_code block until you have refreshed the view.
-
Type compute in the search box again, and select Compute Service again.
-
On the right-hand side of the Configuration page, collapse all of the configuration instances again.
-
Edit sas.compute.server: autoexec_code.
-
Inspect the compute service autoexec_code block. Do you see the new line of code?
Let’s see if it works.
-
Switch to or open SAS Studio (‘Develop Code and Flows’), signed in as sasadm, and wait for a compute session to start. If you already had a compute session running, start a new one by selecting Options > Reset SAS session from the SAS Studio menu bar. It does not matter which compute context you choose for the following test, because we configured the smtp email server options in the global compute server config, which affects all new compute sessions running under every compute context.
-
Paste the following into a new SAS Program window. You can do this while the compute session is still starting up.
Note: Do not run it yet!
* %let mailto = first.last@company.com; * Uncomment this line, and replace first.last@company.com with your email address; %let mailfrom = noreply@sas.com; %let mailcc = ; /* comma-separated list, or leave blank */ %let mailsub = This is a great FANS network meeting!; %let mailprty = normal; /* also 'high' or 'low' */ /* no attachment */ %macro sendmail; filename emailref email "&mailto." from="&mailfrom." cc="&mailcc." importance="&mailprty." subject="&mailsub."; data _null_; file emailref; put "This email was sent during a FANS network meeting."; run; %mend sendmail; %sendmail; -
Uncomment line 1, containing the mailto email address. Delete the initial
*so that the%letis the first thing on line 1. -
Set the mailto macro variable defined on line 1 to your own email address, e.g.:
%let mailto = first.last@company.com; * Uncomment this line, and replace first.last@company.com with your email address; -
When you have set the mailto email address to your own email address, and your new compute session has started, Run the program.
Check the SAS program log for errors. If there are any errors, fix them and try again.
Troubleshooting tips:
- Make sure you started a new compute session; if the compute session started before you added the email options statements to the compute server autoexec, they will not be set for this SAS compute session.
- Try running
proc options group=email;run;. What is the value of the EMAILHOST SAS system option? It should bemailhost.fyi.sas.com.
-
If the program runs without errors, wait a moment for the email to arrive, then check your inbox. Did you get an email like the one below?
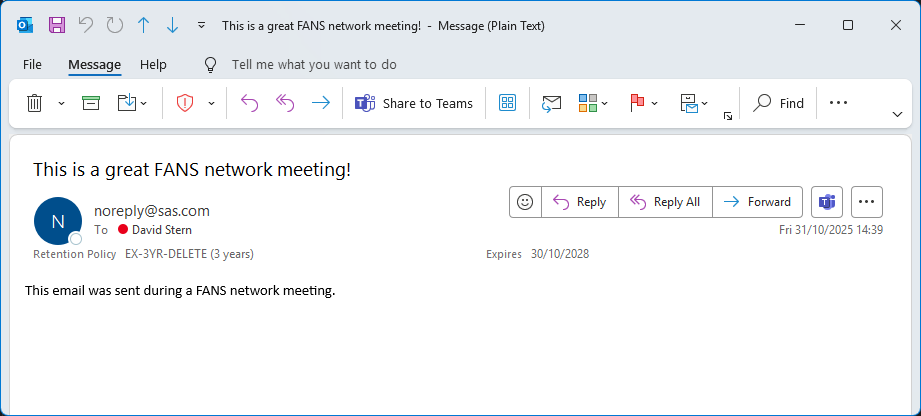
Note: This is just about the simplest plain-text email you could send, and together with the log output illustrates some configuration changes you can make to the SAS Compute Server startup code. SAS can send nicely formatted emails with HTML, attachments and embedded images. Some excellent examples can be seen in this SAS Communities post by Chris Hemedinger: How to send email using SAS. There are plenty of other resources for how to format and send email from SAS programs on the web - find them using your favourite search engine.
16. Create a SAS program file
-
Run the following to create a SAS program file in cloud-user’s home directory:
# Create a SAS program to calculate primes and do some sorting
tee /home/cloud-user/primes.sas > /dev/null << 'EOF'
proc options option=(cpucount);
run;

proc iml;
    start sieve(n);
        a = J(n,1);
        a[1] = 0;
        do i = 1 to n;
            if a[i] then do;
                if i*i>n then return(a);
                a[i*(i:int(n/i))] = 0;
            end;
        end;
    finish;

    a = loc(sieve(100000000))`;
    create primes from a;
    append from a;
    close primes;
quit;

data primes;
  set primes;
  number_in_words=put(col1,words100.);
run;

proc sort data=primes;
  by number_in_words;
run;
EOF

ls -al /home/cloud-user/primes.sas
17. Submit the program as a new SAS Batch job, to run interactively
-
Run the following to submit our SAS code as a batch job, wait for it to complete, and watch the log output as it is produced:
# Submit a SAS program as a batch job, wait for it to complete, and watch the log output as it is produced
sas-viya batch jobs submit-pgm --pgm /home/cloud-user/primes.sas -c default --wait-log-list --watch-output

ls -al /home/cloud-user/primes*
Watch the SAS program’s log output appear in the terminal as it runs. The log output is also saved to primes.sas. Run this to view it again:
cat /home/cloud-user/primes.log
18. Submit the program to run asyncronously as a Batch job
-
Run the following to submit our SAS code as a batch job, but this time do not wait for it to complete, let it run in the background.
# Submit a SAS program to run asynchronously
sas-viya batch jobs submit-pgm --pgm /home/cloud-user/primes.sas -c default
The sas-viya batch jobs submit-pgm command writes out the batch job ID and SAS Workload Orchestrator (WLO) job ID:
>>> The file set "JOB_20251031_171332_886_1" was created. >>> Uploading "primes.sas". >>> The job was submitted. ID: "dde6c994-5501-4586-b213-52372c200ec3" Workload Orchestrator job ID: "76" -
Submit the job again, but this time capture the output and parse it with
grepandawkto get the Job ID and WLO ID:id_line=$(sas-viya batch jobs submit-pgm --pgm /home/cloud-user/primes.sas -c default | grep 'The job was submitted') # echo ${id_line} job_id=$(echo ${id_line} | awk '{print $7}' | tr -d \") echo "job_id=${job_id}" wlo_id=$(echo ${id_line} | awk '{print $12}' | tr -d \") echo "wlo_id=${wlo_id}" -
Now we can check then job status - you may have to run this several times while the job is pending, running, and then completed or failed:
# Get information about the batch job
sas-viya batch jobs list --id ${job_id}

# Get the state of the batch job
sas-viya batch jobs list --id ${job_id} | jq -r .items[0].state
Example output:
{
    "items": [
        {
            "contextId": "70258757-f764-4c4a-a7c7-38ae903d783b",
            "createdBy": "sasadm",
            "creationTimeStamp": "2025-10-31T17:42:51.086274Z",
            "endedTimeStamp": "2025-10-31T17:43:07Z",
            "executionHost": "10.42.7.79",
            "fileSetId": "JOB_20251031_174250_763_1",
            "id": "f187d226-8d39-4418-8b76-825c6a7b45a3",
            "modifiedBy": "sasadm",
            "modifiedTimeStamp": "2025-10-31T17:43:08.709602Z",
            "name": "primes",
            "processId": "a0f14b2e-09ba-4191-9074-05f0d946cb8f",
            "returnCode": 0,
            "startedTimeStamp": "2025-10-31T17:42:51Z",
            "state": "completed",
            "submittedTimeStamp": "2025-10-31T17:42:51Z",
            "workloadJobId": "80"
        }
    ]
}
...and...
completedRe-run the same command(s) until the job state is
completed. -
Download the job results to a new directory, /home/cloud-user/batch_job_results:
mkdir -p /home/cloud-user/batch_job_results
sas-viya batch jobs get-results --id ${job_id} --results-dir /home/cloud-user/batch_job_results
Expected output the first time you run this for a specific job:
{
    "items": [
        {
            "contextId": "70258757-f764-4c4a-a7c7-38ae903d783b",
            "createdBy": "sasadm",
            "creationTimeStamp": "2025-10-31T17:42:51.086274Z",
            "endedTimeStamp": "2025-10-31T17:43:07Z",
            "executionHost": "10.42.7.79",
            "fileSetId": "JOB_20251031_174250_763_1",
            "id": "f187d226-8d39-4418-8b76-825c6a7b45a3",
            "modifiedBy": "sasadm",
            "modifiedTimeStamp": "2025-10-31T17:43:08.709602Z",
            "name": "primes",
            "processId": "a0f14b2e-09ba-4191-9074-05f0d946cb8f",
            "returnCode": 0,
            "startedTimeStamp": "2025-10-31T17:42:51Z",
            "state": "completed",
            "submittedTimeStamp": "2025-10-31T17:42:51Z",
            "workloadJobId": "80"
        }
    ]
}
<<<   Downloading the files in the file set to the following path: "/home/cloud-user/batch_job_results/JOB_20251031_174250_763_1".
<<<   Downloading "primes.log".
<<<   Downloading "primes.sas".
Note: Getting the results of a batch job like this causes the batch service to delete the job results to free up space, so you can only do it once per job. If you try getting the results a second time, you will instead see this:
{ "items": [] } -
View the log file to see what happened - you will have to edit the command below to substitute the path with the one shown in your output to the previous command:
cat /home/cloud-user/batch_job_results/JOB_20251031_174250_763_1/primes.logYou could modify the
sas-viya batch jobs get-resultscommand above to parse its output, get the path where the files in the file set were saved to, and thencatthe content of the program log file to the console. There are lots of things you could do with running SAS batch jobs from the command line, limited only by your imagination and scripting skills. SAS Administrators tend to develop good bash script skills, and have some fun while doing it!
This completes the main part of our SAS Viya Administration hands-on activity for today. But there are a few more things we can do, in the Bonus section.