03 CAS Libraries and Formats
< Back to 02 Project Groups, Folders and Libraries
- 7. Define path-based CAS libraries
- 8. Set access controls on CAS libraries
- 9. Load data into memory for CAS libraries
- 10. Load a CAS format library
7. Define path-based CAS libraries
One for raw input data One for prepared input data One for output data
-
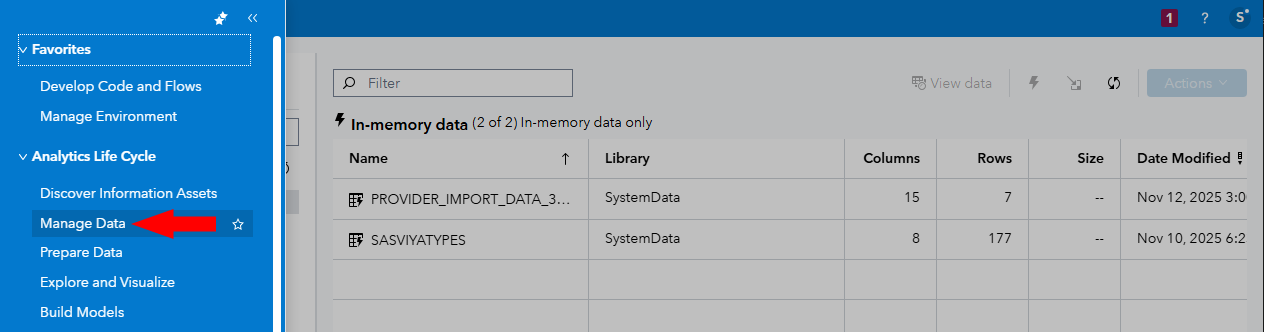
In your web browser with SAS Studio still open, signed in as sasadm, click on the SAS Viya application menu, and choose Manage Data to open SAS Data Explorer.
Note: Alternatively, click the SAS Data Explorer link in the SASViyaLinks page you opened earlier.
-
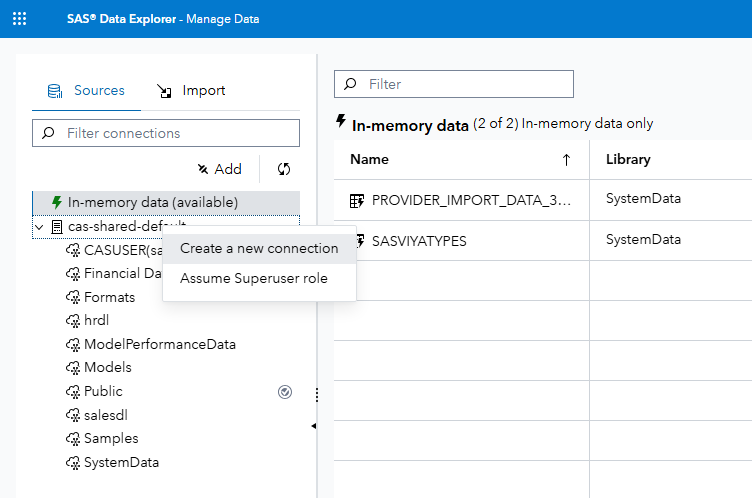
Expand the cas-shared-default CAS server definition, to see existing CAS libraries.
-
Right-click cas-shared-default, and choose Create a new connection.
-
In the Select a Data Source popup, find or use the Filter box to search for ‘path’ and select Path/DNFS as your Data Source.
-
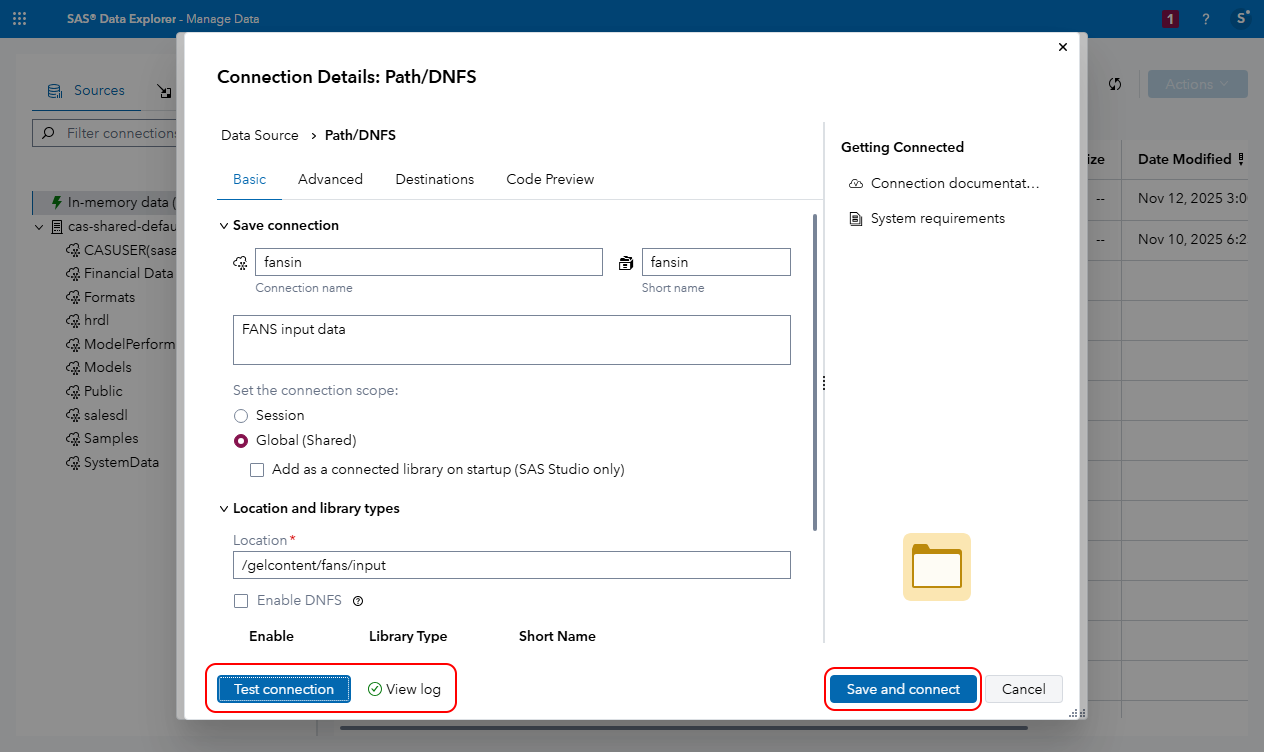
In the Connection Details: Path/DNFS dialog, enter these values, substituting your chosen project name for ‘[Project]’:
Field Value Connection name [Project name in lowercase]in, e.g. fansin Short name Choose a short name of 8 characters or less, e.g. fansin Description (optional) [Project] input data, e.g. FANS input data Set the connection scope: Global (Shared) Add as a connected library on startup (SAS Studio only) Not checked Location /gelcontent/[Project name in lowercase]/input</br>e.g. /gelcontent/fans/input Enable DNFS Not checked -
Click Test connection. If you did everything correctly, you will see a small green tick in a circle and the words ‘View log’ next to the Test connection button, and no error messages.
If something went wrong, you will see a small red x in a circle and the words ‘View log’ next to the Test connection button. View the log messages for help on what is wrong. Try to fix the problem and then click Test connection again.
-
When you get a green tick in a circle after pressing Test connection, click Save and connect.
Alternatively, you could have run this to create the project input CAS library, e.g. fansin:
# Create project input data caslib sas-viya cas caslibs create path \ --caslib "${project_name_short}in" \ --path /gelcontent/${project_name_lowercase}/input \ --server cas-shared-default \ --description "${project_name} input data" \ -su -
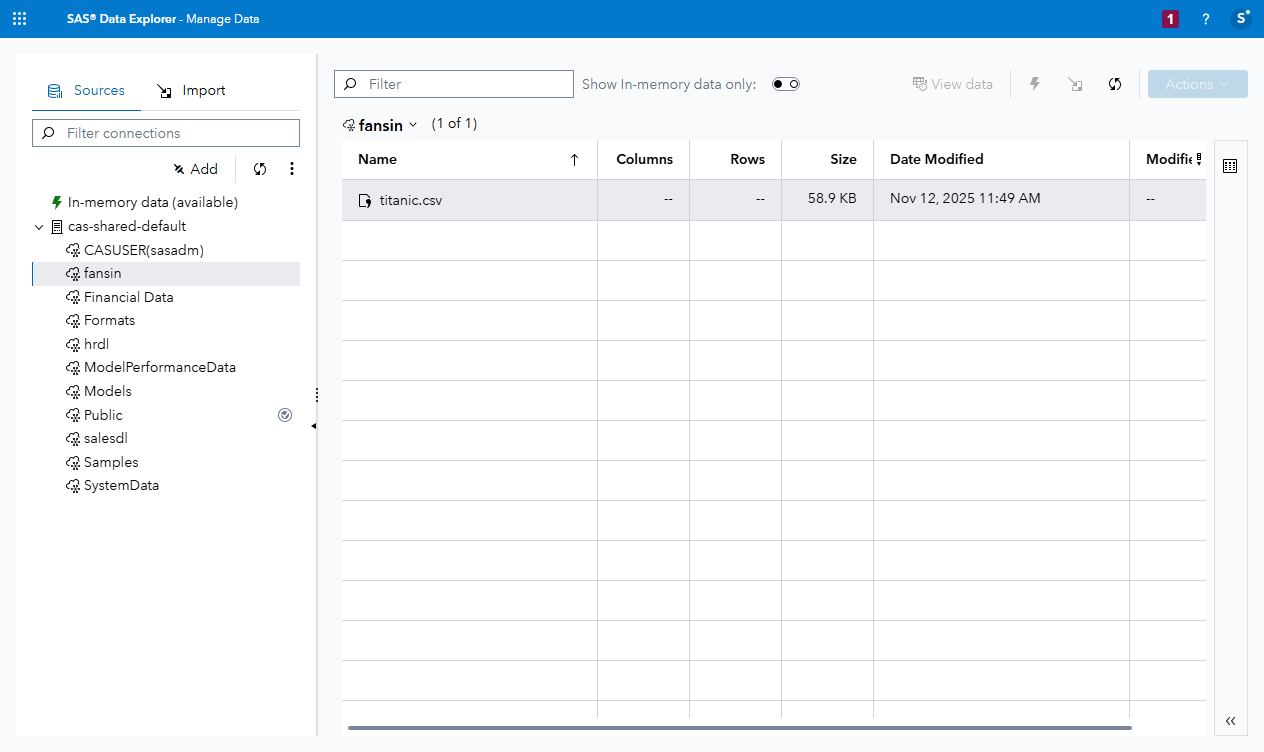
After a moment, you should see the new library listed under the cas-shared-default CAS server.
Select it if it is not already selected.
-
You should see the input table titanic.csv in the grid on the right of the SAS Data Explorer app:
References:
- Making Data Available to CAS in the SAS Viya Platform: Data Preparation documentation
- Rules for Caslib, Table, and Column Names in the SAS Viya Platform: Programming documentation.
-
Run this to create two more CAS libraries named with your project short name with suffixes of ‘prep’ and ‘out’, e.g. fansprep and fansout:
# Create project prepared data caslib sas-viya cas caslibs create path \ --caslib "${project_name_short}prep" \ --path /gelcontent/${project_name_lowercase}/prepared \ --server cas-shared-default \ --description "${project_name} prepared input data" \ -su # Create project output data caslib sas-viya cas caslibs create path \ --caslib "${project_name_short}out" \ --path /gelcontent/${project_name_lowercase}/output \ --server cas-shared-default \ --description "${project_name} output data" \ -su -
List caslibs in the cas-shared-default CAS server:
sas-viya --output text cas caslibs list --server cas-shared-default --limit 20 -
Back in in SAS Data Explorer, click Refresh sources, and expand the cas-shared-default CAS server to see the new caslibs.
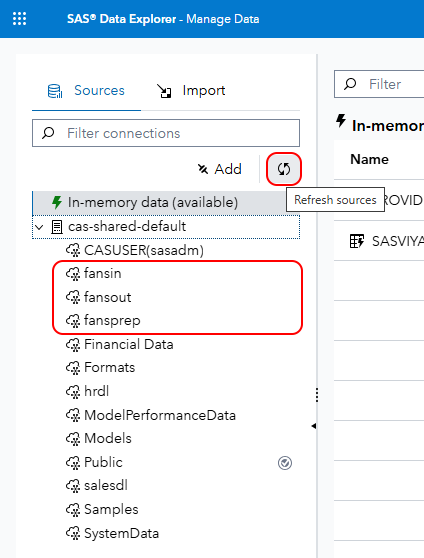
We will not use all of these caslibs in this hands-on activity. We created some of them simply to see how to create path-based caslibs from the command-line.
8. Set access controls on CAS libraries
We are not discussing design, including authorization model design, in this hands-on activity. Because we have 3 custom groups, and 3 CAS libraries, and because CAS has a LOT of permissions, setting access controls is a bigger task than some others. Let’s just imagine we have decided to designed an authorization model for the project, in which:
- All project team members should have ‘read’ permissions on all three project CAS libraries, and all of their tables
- Project content administrators and project power users should both have ‘write’ access to all three caslibs and all of their tables
- SAS Administrators (the custom group which is always defined, and not to be confused with SAS Administrator the user, which we have created in this environment) will have full control of all three caslibs and all of their tables.
Obviously, other authorization model designs might be more appropriate for a real project. For example, there is normally no good reason that all SAS Administrators would to have full control of project CAS tables!
-
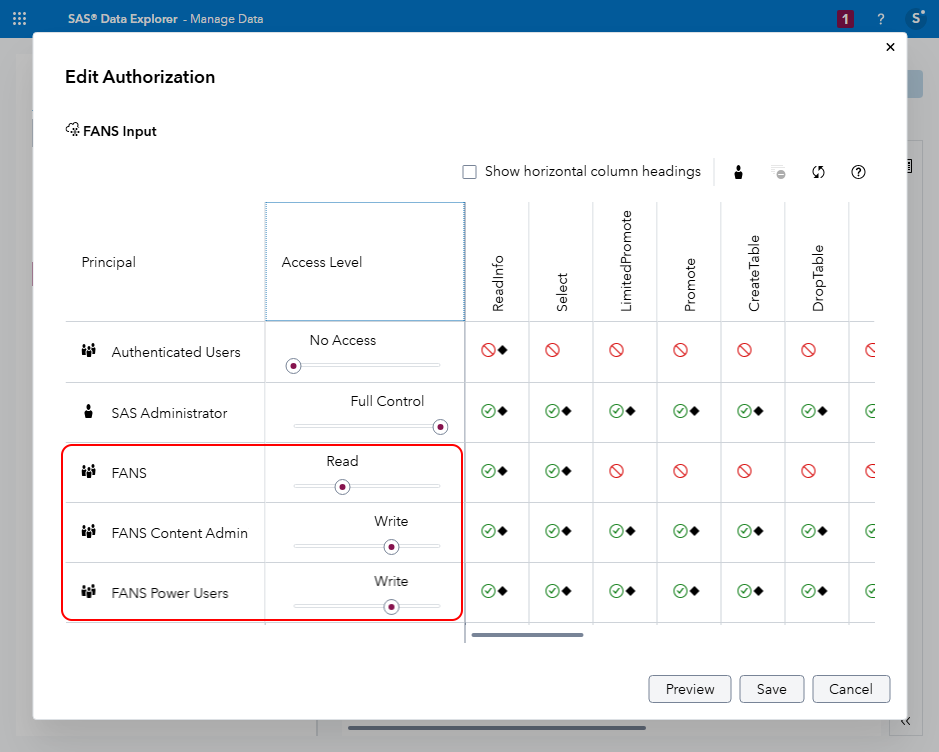
Apply access controls to the input caslib (e.g. fansin) in SAS Data Explorer. Right-click the fansin caslib, and choose Edit Authorization.
Notice that the user who created the caslib (user ID sasadm, display name SAS Administrator), has full control permissions for the caslib. Because of this user’s name, it might be less obvious that the custom group named SAS Administrators (plural) does NOT have any permissions granted for this CAS library.
-
Click Add identities.
- In the Add Identities dialog, select all three of your project’s custom groups e.g. if your project is called FANS, you might have named your custom groups:
- FANS (fans)
- FANS Content Administrators (fans_content_admins)
- FANS Power Users (fans_power_users)
- SAS Administrators (SASAdministrators) - the group
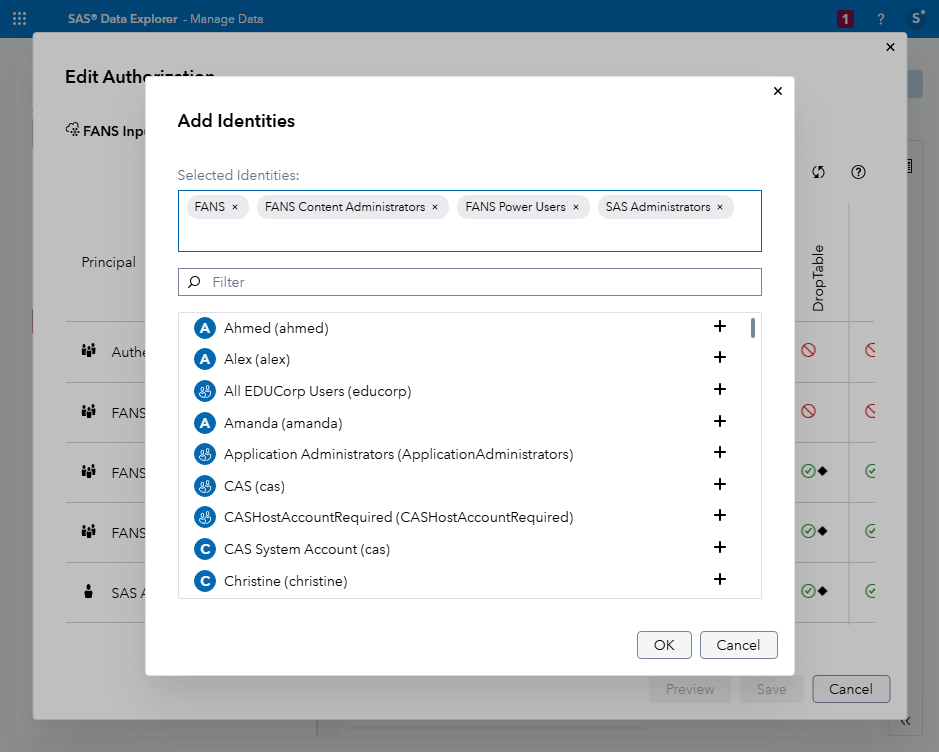
- With your custom groups selected, click OK.
- Move the Access Level sliders for the groups as follows (for your whole project team and its content admins and power users):
- FANS: Read
- FANS Content Administrators: Write
- FANS Power Users: Write
- SAS Administrators: Full Control (not normally recommended)
-
Click Save.
-
We can apply access controls from command line too. Run this to set some access controls on the project prep CAS library (e.g. fansprep):
# Grant all project team members 'Read' permissions on the project data preparation caslib
sas-viya cas caslibs add-control --server cas-shared-default --name "${project_name_short}prep" --group "${project_name_lowercase}" --grant readInfo
sas-viya cas caslibs add-control --server cas-shared-default --name "${project_name_short}prep" --group "${project_name_lowercase}" --grant select
You should see a couple of messages like this:
The requested permission, "readInfo", and type, "grant", was applied to the identity, "fans" on the caslib "fansprep".
The requested permission, "select", and type, "grant", was applied to the identity, "fans" on the caslib "fansprep".
If instead of that you see messages like this:
The caslib "fansprep" is already checked out in another transaction. Did you mean to specify a session ID?
Use the "verbose" option to see further details of this error.
The caslib "fansprep" is already checked out in another transaction. Did you mean to specify a session ID?
Use the "verbose" option to see further details of this error.
...it is because you still have the Edit Authorization window open for the project data preparation caslib in SAS Data Explorer. Click Save to close it and try again.
-
Once the above access control grants are successful, continue to set permissions on fansprep (or whatever your project’s data preparation CAS library is called) for SASAdministrators and for the other two project custom groups:
# Grant SAS Administrators 'Full Control' permissions on the project data preparation caslib
sas-viya cas caslibs add-control --server cas-shared-default --name "${project_name_short}prep" --group "SASAdministrators" --grant readInfo
sas-viya cas caslibs add-control --server cas-shared-default --name "${project_name_short}prep" --group "SASAdministrators" --grant select
sas-viya cas caslibs add-control --server cas-shared-default --name "${project_name_short}prep" --group "SASAdministrators" --grant limitedPromote
sas-viya cas caslibs add-control --server cas-shared-default --name "${project_name_short}prep" --group "SASAdministrators" --grant promote
sas-viya cas caslibs add-control --server cas-shared-default --name "${project_name_short}prep" --group "SASAdministrators" --grant createTable
sas-viya cas caslibs add-control --server cas-shared-default --name "${project_name_short}prep" --group "SASAdministrators" --grant dropTable
sas-viya cas caslibs add-control --server cas-shared-default --name "${project_name_short}prep" --group "SASAdministrators" --grant deleteSource
sas-viya cas caslibs add-control --server cas-shared-default --name "${project_name_short}prep" --group "SASAdministrators" --grant insert
sas-viya cas caslibs add-control --server cas-shared-default --name "${project_name_short}prep" --group "SASAdministrators" --grant update
sas-viya cas caslibs add-control --server cas-shared-default --name "${project_name_short}prep" --group "SASAdministrators" --grant delete
sas-viya cas caslibs add-control --server cas-shared-default --name "${project_name_short}prep" --group "SASAdministrators" --grant alterTable
sas-viya cas caslibs add-control --server cas-shared-default --name "${project_name_short}prep" --group "SASAdministrators" --grant alterCaslib
sas-viya cas caslibs add-control --server cas-shared-default --name "${project_name_short}prep" --group "SASAdministrators" --grant manageAccess

# Grant project content admins 'Write' permissions on the project data preparation caslib
sas-viya cas caslibs add-control --server cas-shared-default --name "${project_name_short}prep" --group "${project_name_lowercase}_content_admins" --grant readInfo
sas-viya cas caslibs add-control --server cas-shared-default --name "${project_name_short}prep" --group "${project_name_lowercase}_content_admins" --grant select
sas-viya cas caslibs add-control --server cas-shared-default --name "${project_name_short}prep" --group "${project_name_lowercase}_content_admins" --grant limitedPromote
sas-viya cas caslibs add-control --server cas-shared-default --name "${project_name_short}prep" --group "${project_name_lowercase}_content_admins" --grant promote
sas-viya cas caslibs add-control --server cas-shared-default --name "${project_name_short}prep" --group "${project_name_lowercase}_content_admins" --grant createTable
sas-viya cas caslibs add-control --server cas-shared-default --name "${project_name_short}prep" --group "${project_name_lowercase}_content_admins" --grant dropTable
sas-viya cas caslibs add-control --server cas-shared-default --name "${project_name_short}prep" --group "${project_name_lowercase}_content_admins" --grant deleteSource
sas-viya cas caslibs add-control --server cas-shared-default --name "${project_name_short}prep" --group "${project_name_lowercase}_content_admins" --grant insert
sas-viya cas caslibs add-control --server cas-shared-default --name "${project_name_short}prep" --group "${project_name_lowercase}_content_admins" --grant update
sas-viya cas caslibs add-control --server cas-shared-default --name "${project_name_short}prep" --group "${project_name_lowercase}_content_admins" --grant delete
sas-viya cas caslibs add-control --server cas-shared-default --name "${project_name_short}prep" --group "${project_name_lowercase}_content_admins" --grant alterTable

# Grant project power users 'Write' permissions on the project data preparation caslib
sas-viya cas caslibs add-control --server cas-shared-default --name "${project_name_short}prep" --group "${project_name_lowercase}_power_users" --grant readInfo
sas-viya cas caslibs add-control --server cas-shared-default --name "${project_name_short}prep" --group "${project_name_lowercase}_power_users" --grant select
sas-viya cas caslibs add-control --server cas-shared-default --name "${project_name_short}prep" --group "${project_name_lowercase}_power_users" --grant limitedPromote
sas-viya cas caslibs add-control --server cas-shared-default --name "${project_name_short}prep" --group "${project_name_lowercase}_power_users" --grant promote
sas-viya cas caslibs add-control --server cas-shared-default --name "${project_name_short}prep" --group "${project_name_lowercase}_power_users" --grant createTable
sas-viya cas caslibs add-control --server cas-shared-default --name "${project_name_short}prep" --group "${project_name_lowercase}_power_users" --grant dropTable
sas-viya cas caslibs add-control --server cas-shared-default --name "${project_name_short}prep" --group "${project_name_lowercase}_power_users" --grant deleteSource
sas-viya cas caslibs add-control --server cas-shared-default --name "${project_name_short}prep" --group "${project_name_lowercase}_power_users" --grant insert
sas-viya cas caslibs add-control --server cas-shared-default --name "${project_name_short}prep" --group "${project_name_lowercase}_power_users" --grant update
sas-viya cas caslibs add-control --server cas-shared-default --name "${project_name_short}prep" --group "${project_name_lowercase}_power_users" --grant delete
sas-viya cas caslibs add-control --server cas-shared-default --name "${project_name_short}prep" --group "${project_name_lowercase}_power_users" --grant alterTable
This works, but you will have noticed that it is quite slow, verbose to read and it not a lot of fun to write. A bash function, or macro in some other language which supports looping would help.
Fortunately, there’s a more efficient way to bulk load CAS access controls using the sas-viya CLI.
-
First, create a JSON file defining the CAS library permissions we want to apply. Run this all at once:
# Create a JSON file defining CAS permissions for identities # This file will grant to a (unspecified) caslib: # Project team members: read permissions (readInfo and Select only) # SAS Administrators: full control # Project content administrators: write permissions # Project power users: write permissions tee /workshop/gelcontent/${project_name_lowercase}/${project_name_lowercase}_caslib_permissions.json > /dev/null << EOF { "items": [ { "identity": "${project_name_lowercase}", "identityType": "group", "permission": "readInfo", "type": "grant", "version": 1 }, { "identity": "${project_name_lowercase}", "identityType": "group", "permission": "select", "type": "grant", "version": 1 }, { "identity": "SASAdministrators", "identityType": "group", "permission": "readInfo", "type": "grant", "version": 1 }, { "identity": "SASAdministrators", "identityType": "group", "permission": "select", "type": "grant", "version": 1 }, { "identity": "SASAdministrators", "identityType": "group", "permission": "insert", "type": "grant", "version": 1 }, { "identity": "SASAdministrators", "identityType": "group", "permission": "update", "type": "grant", "version": 1 }, { "identity": "SASAdministrators", "identityType": "group", "permission": "delete", "type": "grant", "version": 1 }, { "identity": "SASAdministrators", "identityType": "group", "permission": "createTable", "type": "grant", "version": 1 }, { "identity": "SASAdministrators", "identityType": "group", "permission": "dropTable", "type": "grant", "version": 1 }, { "identity": "SASAdministrators", "identityType": "group", "permission": "alterTable", "type": "grant", "version": 1 }, { "identity": "SASAdministrators", "identityType": "group", "permission": "promote", "type": "grant", "version": 1 }, { "identity": "SASAdministrators", "identityType": "group", "permission": "alterCaslib", "type": "grant", "version": 1 }, { "identity": "SASAdministrators", "identityType": "group", "permission": "manageAccess", "type": "grant", "version": 1 }, { "identity": "SASAdministrators", "identityType": "group", "permission": "deleteSource", "type": "grant", "version": 1 }, { "identity": "SASAdministrators", "identityType": "group", "permission": "limitedPromote", "type": "grant", "version": 1 }, { "identity": "${project_name_lowercase}_content_admins", "identityType": "group", "permission": "readInfo", "type": "grant", "version": 1 }, { "identity": "${project_name_lowercase}_content_admins", "identityType": "group", "permission": "select", "type": "grant", "version": 1 }, { "identity": "${project_name_lowercase}_content_admins", "identityType": "group", "permission": "limitedPromote", "type": "grant", "version": 1 }, { "identity": "${project_name_lowercase}_content_admins", "identityType": "group", "permission": "promote", "type": "grant", "version": 1 }, { "identity": "${project_name_lowercase}_content_admins", "identityType": "group", "permission": "createTable", "type": "grant", "version": 1 }, { "identity": "${project_name_lowercase}_content_admins", "identityType": "group", "permission": "dropTable", "type": "grant", "version": 1 }, { "identity": "${project_name_lowercase}_content_admins", "identityType": "group", "permission": "deleteSource", "type": "grant", "version": 1 }, { "identity": "${project_name_lowercase}_content_admins", "identityType": "group", "permission": "insert", "type": "grant", "version": 1 }, { "identity": "${project_name_lowercase}_content_admins", "identityType": "group", "permission": "update", "type": "grant", "version": 1 }, { "identity": "${project_name_lowercase}_content_admins", "identityType": "group", "permission": "delete", "type": "grant", "version": 1 }, { "identity": "${project_name_lowercase}_content_admins", "identityType": "group", "permission": "alterTable", "type": "grant", "version": 1 }, { "identity": "${project_name_lowercase}_power_users", "identityType": "group", "permission": "readInfo", "type": "grant", "version": 1 }, { "identity": "${project_name_lowercase}_power_users", "identityType": "group", "permission": "select", "type": "grant", "version": 1 }, { "identity": "${project_name_lowercase}_power_users", "identityType": "group", "permission": "limitedPromote", "type": "grant", "version": 1 }, { "identity": "${project_name_lowercase}_power_users", "identityType": "group", "permission": "promote", "type": "grant", "version": 1 }, { "identity": "${project_name_lowercase}_power_users", "identityType": "group", "permission": "createTable", "type": "grant", "version": 1 }, { "identity": "${project_name_lowercase}_power_users", "identityType": "group", "permission": "dropTable", "type": "grant", "version": 1 }, { "identity": "${project_name_lowercase}_power_users", "identityType": "group", "permission": "deleteSource", "type": "grant", "version": 1 }, { "identity": "${project_name_lowercase}_power_users", "identityType": "group", "permission": "insert", "type": "grant", "version": 1 }, { "identity": "${project_name_lowercase}_power_users", "identityType": "group", "permission": "update", "type": "grant", "version": 1 }, { "identity": "${project_name_lowercase}_power_users", "identityType": "group", "permission": "delete", "type": "grant", "version": 1 }, { "identity": "${project_name_lowercase}_power_users", "identityType": "group", "permission": "alterTable", "type": "grant", "version": 1 } ] } EOF -
Bulk-load those access controls for the project output CAS library. Here we are using
sas-viya cas caslibs add-controls, but you could also consider usingsas-viya cas caslibs replace-controls.sas-viya cas caslibs add-controls --server cas-shared-default --name "${project_name_short}out" --source-file /workshop/gelcontent/${project_name_lowercase}/${project_name_lowercase}_caslib_permissions.jsonExpected output:
The requested access controls in the source file "/workshop/gelcontent/fans/fans_caslib_permissions.json" were applied to the caslib "fansout".Applying the same pattern of permissions to other caslibs, or to the same caslib re-created in future, would now be as simple as re-running the sas-viya cas caslibs add-controls (or replace-controls) command above. If you have to apply the same permissions to a lot of caslibs, or you want to automate the process, bulk-loading them from one or more JSON files can be much more efficient.
-
In SAS Data Explorer, view the authorization for the project input (e.g. fansin), prep (e.g. fansprep) or output caslib (e.g. fansout). They all have the same permissions applied in our simple (!) authorization model design:
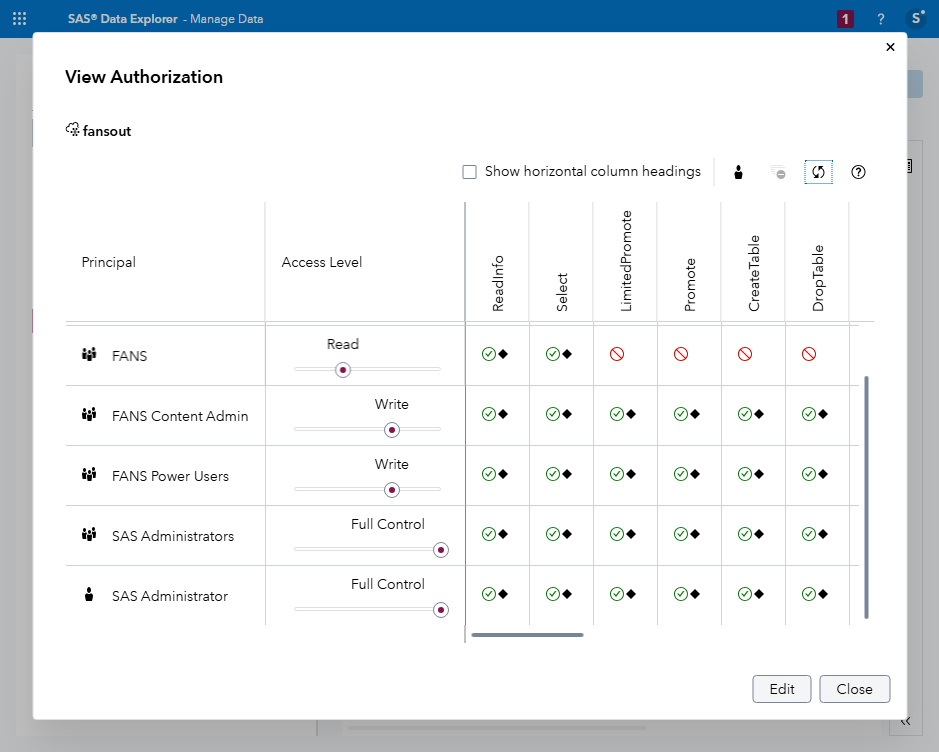
Note: If you scroll up a little you can see that Authenticated Users have no access to this caslib.
Note: I do not want to give the impression that this set of access controls is ‘correct’, for these or any other cas libraries. The correct set of permissions depends on your business requirements, what you wish to allow each group of users to do and not do, and your authorization model design. Here we have seen how to apply an authorization model, but we have not really thought very much about what that the design of that authorization model should be. In a real environment, you do have to think about that, carefully.
9. Load data into memory for CAS libraries
-
For now we only have one table, titanic.csv in one CAS library, the input caslib, but let’s load it anyway. There are many ways to load tables, but this one will do fine.
-
Still in SAS Data Explorer, select the project input CAS library again (e.g. fansin).
-
Right click titanic.csv, and choose Load into memory.
Alternatively you can load a CAS table into memory like this:
# Load all tables in the project input caslib
# sas-viya cas tables load --server=cas-shared-default --caslib="${project_name_lowercase}in" --table=*

# Load a single table in the project input caslib
sas-viya cas tables load --server=cas-shared-default --caslib="${project_name_lowercase}in" --table="titanic.csv"
Expected output:
The table "TITANIC" has been loaded to CAS. -
In SAS Data Explorer, right-click the TITANIC in-memory table, and choose View Data.
-
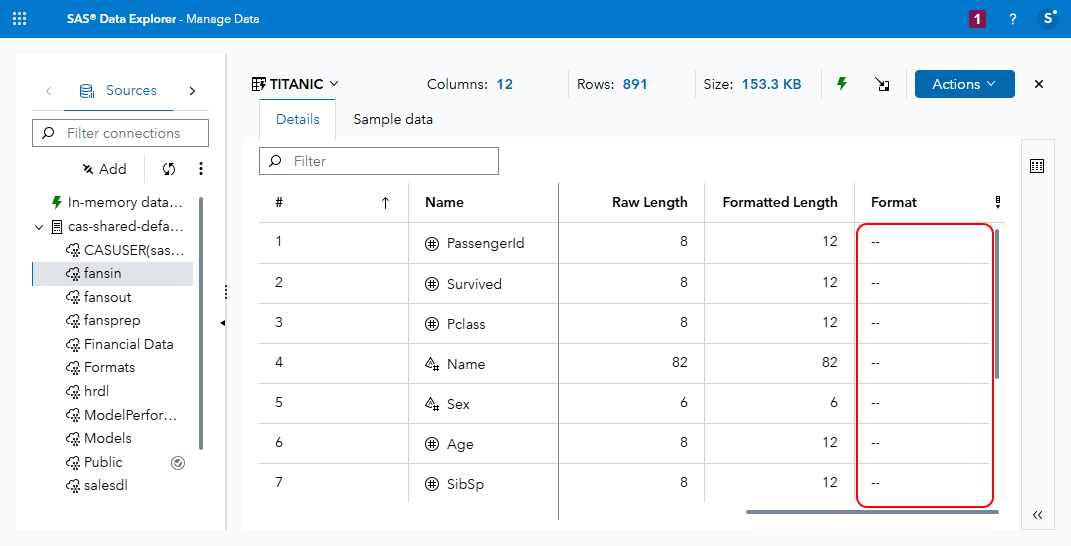
In the Details tab, scroll to the right, where you may see that ‘--‘ is displayed in the Format column for each table column:
-
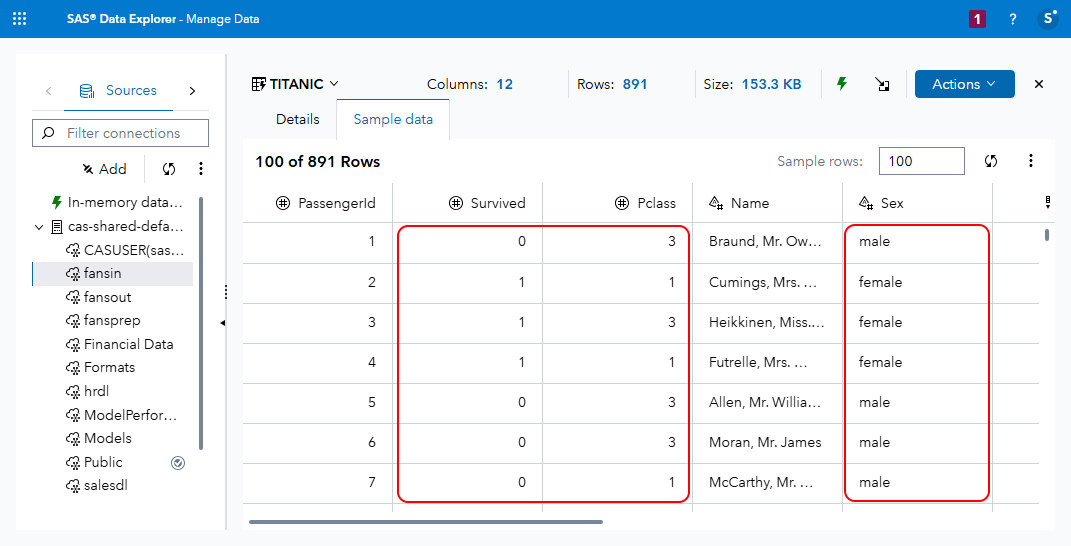
Switch to the Sample data tab, and notice that, as they are in the source CSV data:
- Values in the Survived column are 0 or 1
- Values in the Pclass column are 1, 2 or 3
- Values in the Sex column are all lowercase
- Values in the Fare column are decimals - in many cases to more than 2 decimal places, presumably because they have been converted to US Dollars from another currency
- Values in the Embarked column are single characters: C, S or Q
10. Load a CAS format library
See also: Importing User-defined Formats to CAS in the SAS Viya Platform, Gerry Nelson, SAS Communities Library, 20 March 2023
We will work with a formats files in /workshop/gelcontent/formats (on the server), which is /gelcontent/formats inside SAS Viya pods.
Since we do not have any other formats conveniently available, we will run a SAS program to create some formats and store them in a SAS Format catalogue file (/gelcontent/formats/${project_name_short}fmt.sas7bcat). A format catalogue file can store the definitions of multiple formats. (This is one of several ways to store and import formats into CAS. See Gerry Nelson’s SAS Communities Library article linked above.)
-
Open SAS Studio (‘Develop Code and Flows’), as sasadm, and wait for a SAS compute session to start (under the default SAS Studio compute context).
-
Run the following code in a new SAS program tab, to create a new SAS format catalogue and demonstrate how it transforms displayed values in a dataset:
Note: if you named your project something other than FANS, modify the first line to be your project name in lowercase.
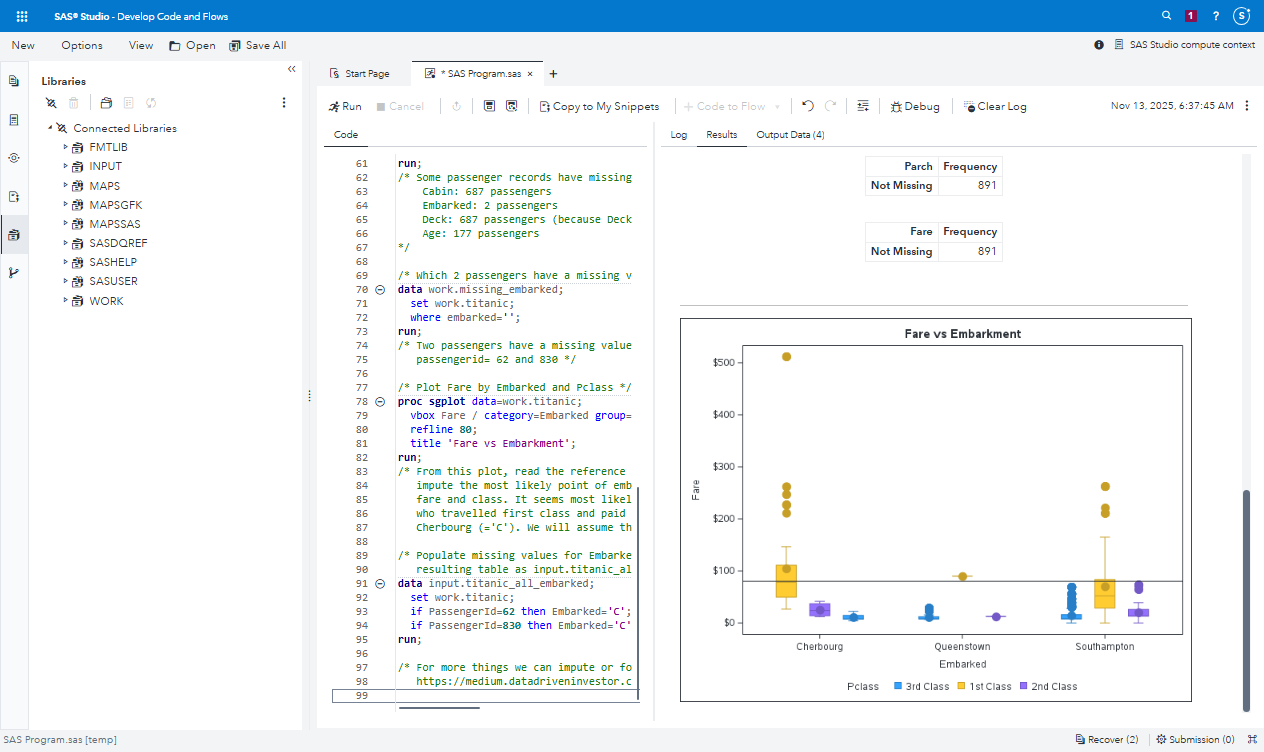
%let project = fans;

libname fmtlib "/gelcontent/formats";
libname input "/gelcontent/&project./input";

*   Read in titanic.csv;
proc import datafile = "/gelcontent/&project./input/titanic.csv"
    out = input.titanic
    dbms=csv
    replace;
run;

proc format lib=fmtlib.&project.formats;
    /* Format for the 'Survived' variable (0=No, 1=Yes) */
    value survived_fmt
    0 = 'No'
    1 = 'Yes';

    /* Format for the 'Sex' variable (male, female) */
    value $sex_fmt
    'male' = 'Male'
    'female' = 'Female';

    /* Format for the 'Pclass' variable (1=1st, 2=2nd, 3=3rd) */
    value pclass_fmt
    1 = '1st Class'
    2 = '2nd Class'
    3 = '3rd Class';

    /* Format for the 'Embarked' variable (C=Cherbourg, Q=Queenstown, S=Southampton) */
    value $embarked_fmt
    'C' = 'Cherbourg'
    'Q' = 'Queenstown'
    'S' = 'Southampton';
run;

options fmtsearch=(fmtlib.&project.formats);
data work.titanic;
    set input.titanic;
    format
        Survived survived_fmt.
        sex $sex_fmt.
        pclass pclass_fmt.
        embarked $embarked_fmt.
        fare dollar10.2
        Deck $1.;
    Deck = substr(Cabin,1,1);
run;

/* Look at which columns have missing values */
proc format;
  value $missfmt ' '='Missing' other='Not Missing';
  value  missfmt  . ='Missing' other='Not Missing';
run;

proc freq data=work.titanic;
  format _CHAR_ $missfmt.;
  tables _CHAR_ / missing missprint nocum nopercent;
  format _NUMERIC_ missfmt.;
  tables _NUMERIC_ / missing missprint nocum nopercent;
run;
/* Some passenger records have missing values for:
    Cabin: 687 passengers
    Embarked: 2 passengers
    Deck: 687 passengers (because Deck is derived from Cabin)
    Age: 177 passengers
*/

/* Which 2 passengers have a missing value for embarked? */
data work.missing_embarked;
  set work.titanic;
  where embarked='';
run;
/* Two passengers have a missing value for embarked:
   passengerid= 62 and 830 */

/* Plot Fare by Embarked and Pclass */
proc sgplot data=work.titanic;
  vbox Fare / category=Embarked group=Pclass;
  refline 80;
  title 'Fare vs Embarkment';
run;
/* From this plot, read the reference line at $80 across to
   impute the most likely point of embarkation for that
   fare and class. It seems most likely that a passenger
   who travelled first class and paid $80 embarked at
   Cherbourg (='C'). We will assume that. */

/* Populate missing values for Embarked, and save
   resulting table as input.titanic_all_embarked */
data input.titanic_all_embarked;
  set work.titanic;
  if PassengerId=62 then Embarked='C';
  if PassengerId=830 then Embarked='C';
run;

/* For more things we can impute or forecast, see
   https://medium.datadriveninvestor.com/kaggle-machine-learning-challenge-done-using-sas-a71e72a94cf4 */
Note: After running the code, if you like, you can scroll down in the Results tab in SAS Studio to see a plot of some of the data produced by proc sgplot:
Note: This activity is not really about SAS programming, it is about SAS Viya administration. So while each data step and procedure has some comments, we will not discuss the program much here.
Note: The main result of running this code that interests us is that it defined a libref (which it calls
fmtlib) pointing to the filesystem directory/gelcontent/formats, and on lines 13-35 of the program it has a proc format statement which defines several new formats, which it stores in a SAS catalogue file (sas7bcat) called e.g.fansformats.sas7bcatin that library. It also adds them to the format search path during this SAS compute session, but that doesn’t apply to anything outside this SAS compute session. -
Switch to SAS Environment Manager (Manage Environment).
-
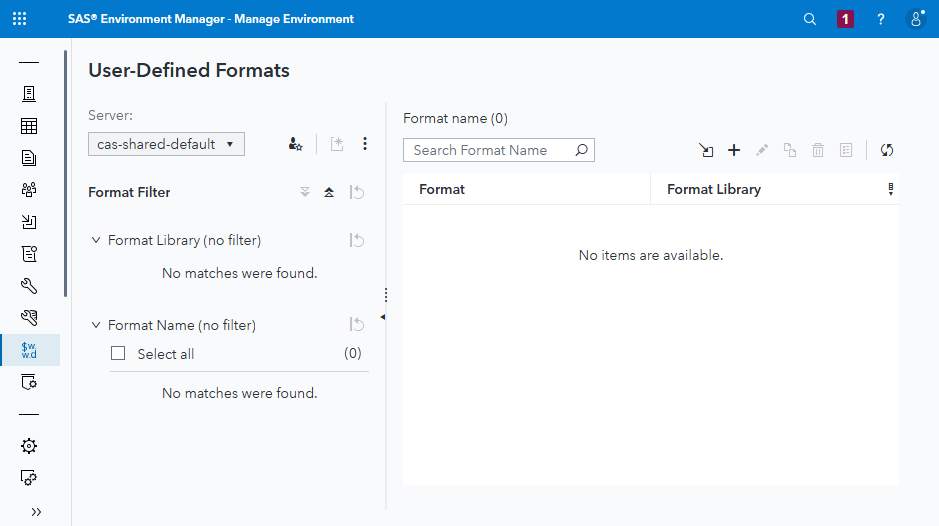
In SAS Environment Manager, as sasadm, view the User-Defined Formats page. There are no user defined formats yet:
-
View the filesystem directory for a GELCorp formats library, both on the server and as it is mounted inside the CAS controller:
# See the project formats .sas7bcat catalogue file in the shared filesystem from the server
ls -l /workshop/gelcontent/formats

# Exec into the CAS controller to show the same formats .sas7bcat catalogue file in the shared filesystem, but from inside the CAS controller.
# Note the path is different: it does not start with /workshop.
kubectl exec -i -t -n edu sas-cas-server-default-controller -c sas-cas-server -- sh -c "ls -l /gelcontent/formats"
Expected output includes:
cloud-user@server:~$ ls -l /workshop/gelcontent/formats
total 20
-rw-rw-rw- 1 sasadm vmail 24576 Nov 13 11:37 fansformats.sas7bcat
Note: The output of both commands show the same file, from different persectives. If your project is called ‘fans’ then the file is named
fansformats.sas7bcat. -
Load the file into CAS user-defined formats.
Note: In a single step the command below creates a CAS format library (which is a file or table, not a caslib), updates the CAS format search order to include it, and imports the formats from the .sas7bcat format catalogue into the new CAS format library file/table:
# Import a SAS format catalogue into a new CAS format library and add it to the format search order in the process.
sas-viya cas format-libraries create \
  --server cas-shared-default \
  --caslib "formats" \
  --format-library "${project_name_short}fmt" \
  --search-order prepend \
  --source-path /gelcontent/formats/${project_name_short}formats.sas7bcat \
  --su
Expected output:
The SAS format library "fansfmt" was successfully created and was prepended to the beginning of the SAS format search order.Again, there are lots of ways to store and import formats into CAS, including from SAS program code - since we just created the formats in a SAS program, that would arguably be even more efficient. Using the sas-viya CLI is just one of many methods.
-
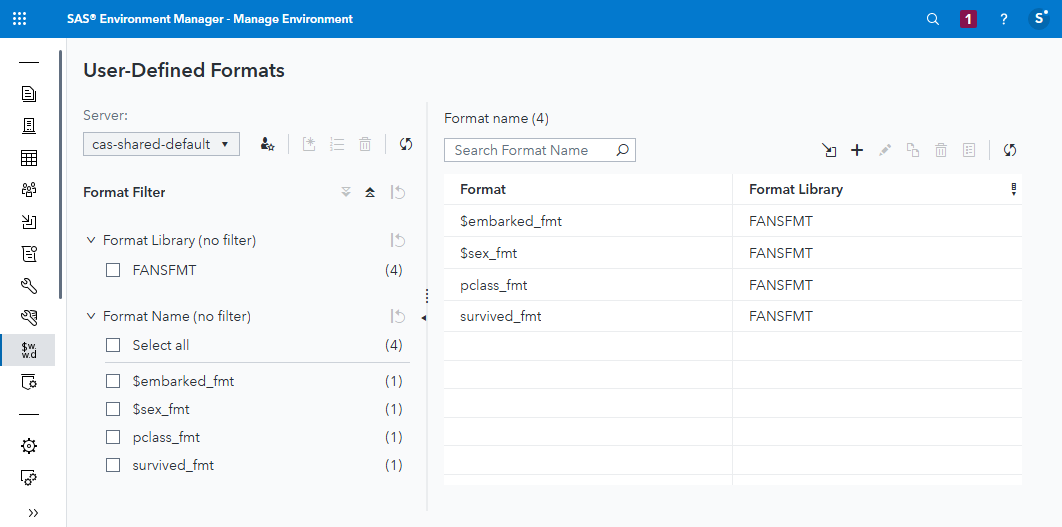
In SAS Environment Manager, as sasadm, refresh the view of the User-Defined Formats page by pressing the refresh (🗘) button top right. There are now four user defined formats available to CAS, all in the FANSFOR format library (which as you remember, is a file in the Formats caslib, not a caslib in its own right):
-
Switch back to SAS Studio (Develop Code and Flows), and open another New > SAS Program tab.
-
Run this SAS code to apply the formats you created to the new CAS table:
%let project = fans; cas &project.fmtexamplesession sessopts=(metrics=true messagelevel=all); /* List format libraries available in this CAS session */ cas &project.fmtexamplesession listformats; /* List the members of these format libraries */ cas &project.fmtexamplesession listformats members; /* Promote the FANSFMT CAS format library to global scope */ cas &project.fmtexamplesession promotefmtlib fmtlibname=&project.fmt replace; proc casutil; altertable casdata="TITANIC" incaslib="&project.in" COLUMNS= { {name= "Survived" format="survived_fmt"} {name= "sex" format="$sex_fmt"} {name= "pclass" format="pclass_fmt"} {name= "embarked" format="$embarked_fmt"} {name= "fare" format="dollar10.2"} }; quit; cas &project.fmtexamplesession terminate ; -
Switch to SAS Data Explorer (‘Manage Data’).
-
In the Sources panel, expand cas-shared-default if it isn’t expanded already, and select your project input caslib, e.g. fansin. Select the TITANIC in-memory table.
-
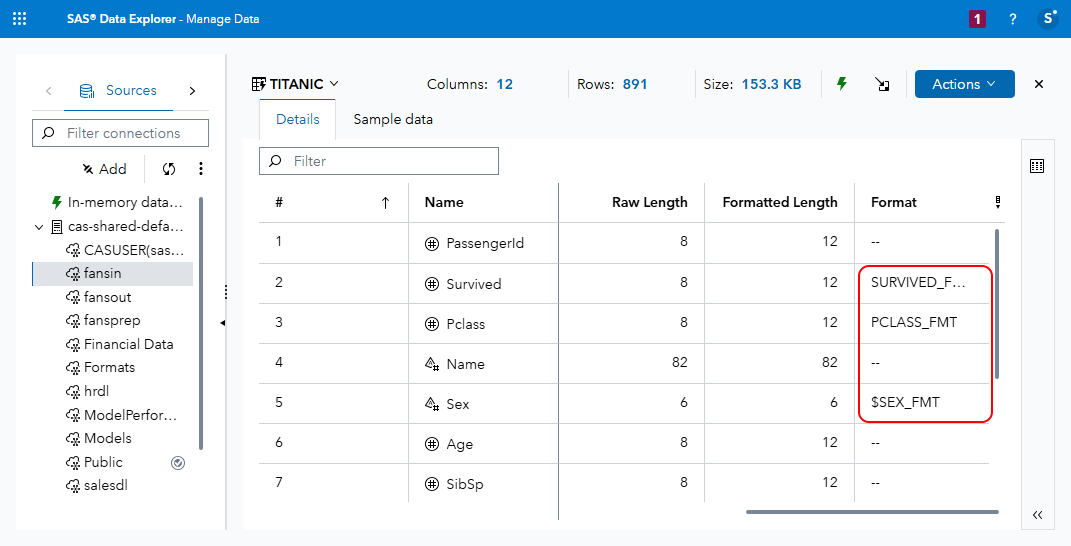
On the Details tab, you can see that the formats you specified in the proc casutil statement have been applied to the relevant columns in the table:
Note: You may have to scroll to the right of the Details tab for this table to see the formats of each column.
-
Select the Sample data tab, and click the Refresh table button (🗘), to the top right of the data grid. Formatted values are now displayed for the Survived, Pclass, Sex, Fare and (if you scroll all the way to the right) Embarked columns:

-
Switch to SAS Visual Analytics (‘Explore and Visualise’).
-
Create a New Report.
-
In the Data panel on the left, click Add data.
-
In the Choose Data dialog, select the TITANIC table, and click Add.
-
Drag the Embarked category variable from the data panel on the left and drop it in the main designer area in the center of the window. This creates an ‘Auto chart’ of frequency of values of the Embarked column.
-
In the auto chart of Embarked, notice that the value labels are the formatted values:
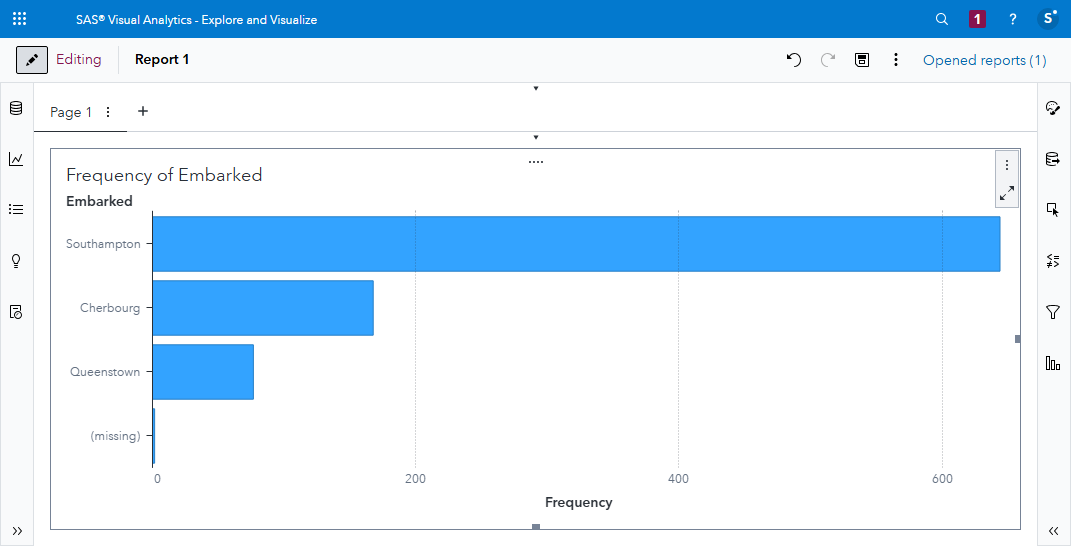
Unformatted Embarked values are stored in the TITANIC table as a single character (in a varchar data type column of length 1). But you are seeing formatted values of Embarked in this SAS Visual Analytics report.
We have applied formats to the in-memory CAS table, but we have not saved the formatted table to disk in a database or some other type of persistent storage. If we were to unload the table from memory and load it again, it would revert to being unformatted.
SAS has many ways in which you can to save formatted tables to a CAS library so that they will still be formatted if you unload them and load them again. SAS Data Management is a large and interesting topic, and you can learn more about it in many places including through the SAS Data Engineering Learning Subscription in learn.sas.com.
Continue to 04 Programming Run-time Administration